In this post we’ll be covering how to use gradients within Flutter. Gradients can make an application look beautiful, and they’re simpler than ever to use in Flutter.
If you aren’t familiar with Flutter, then you can check out my Introduction to Flutter post here.
Project Setup
Okay, let’s get to using some gradients! Start off by creating a new Flutter project:
# Create a new Flutter project
$ flutter create gradients && cd gradients

# Open project in VS Code
$ code .
Now, let’s use this code to start off our application:
import 'package:flutter/material.dart';
void main() => runApp(HomePage());
class HomePage extends StatelessWidget {
Widget build(BuildContext context) {
return MaterialApp(
title: 'Flutter Gradients',
home: Scaffold(
appBar: AppBar(
title: Text('Flutter Gradients'),
),
body: Container(
child: Center(
child: Text('Gradients are cool!',
style: TextStyle(
fontSize: 35,
color: Colors.white,
),
),
),
),
),
);
}
}As you can see, we’ve got a Container, with a Center and Text widget, along with a little styling. We’ve also got an AppBar with a title.
Assigning a BoxDecoration
To use gradients within Flutter, we need to access the decoration property inside of our Container widget, and then assign a BoxDecoration. Lets do that:
body: Container(
  decoration: BoxDecoration(
  ),
  child: Center(
    child: Text('Gradients are cool!',
      style: TextStyle(
        fontSize: 35
      ),
    ),
  ),
),
Good. From now, we can actually start creating our gradient. In Flutter, there are three types of gradients, a linear gradient, a radial gradient and a sweep gradient. In this post, we’ll be exploring all three.
Creating a LinearGradient
First of all, let’s implement a linear gradient into our application:
body: Container(
  decoration: BoxDecoration(
    gradient: LinearGradient(
      colors: [Colors.green, Colors.blue])
  ),
  child: Center(
    child: Text('Gradients are cool!',
      style: TextStyle(
        fontSize: 35,
        color: Colors.white,
      ),
    ),
  ),
),
Inside of our BoxDecoration, we’ve added a gradient property, which gives us the ability to use the LinearGradient widget. Inside of our LinearGradient widget we’ve added the property of colors, which we’ve made blue and green. Let’s have a look at what that gives us:
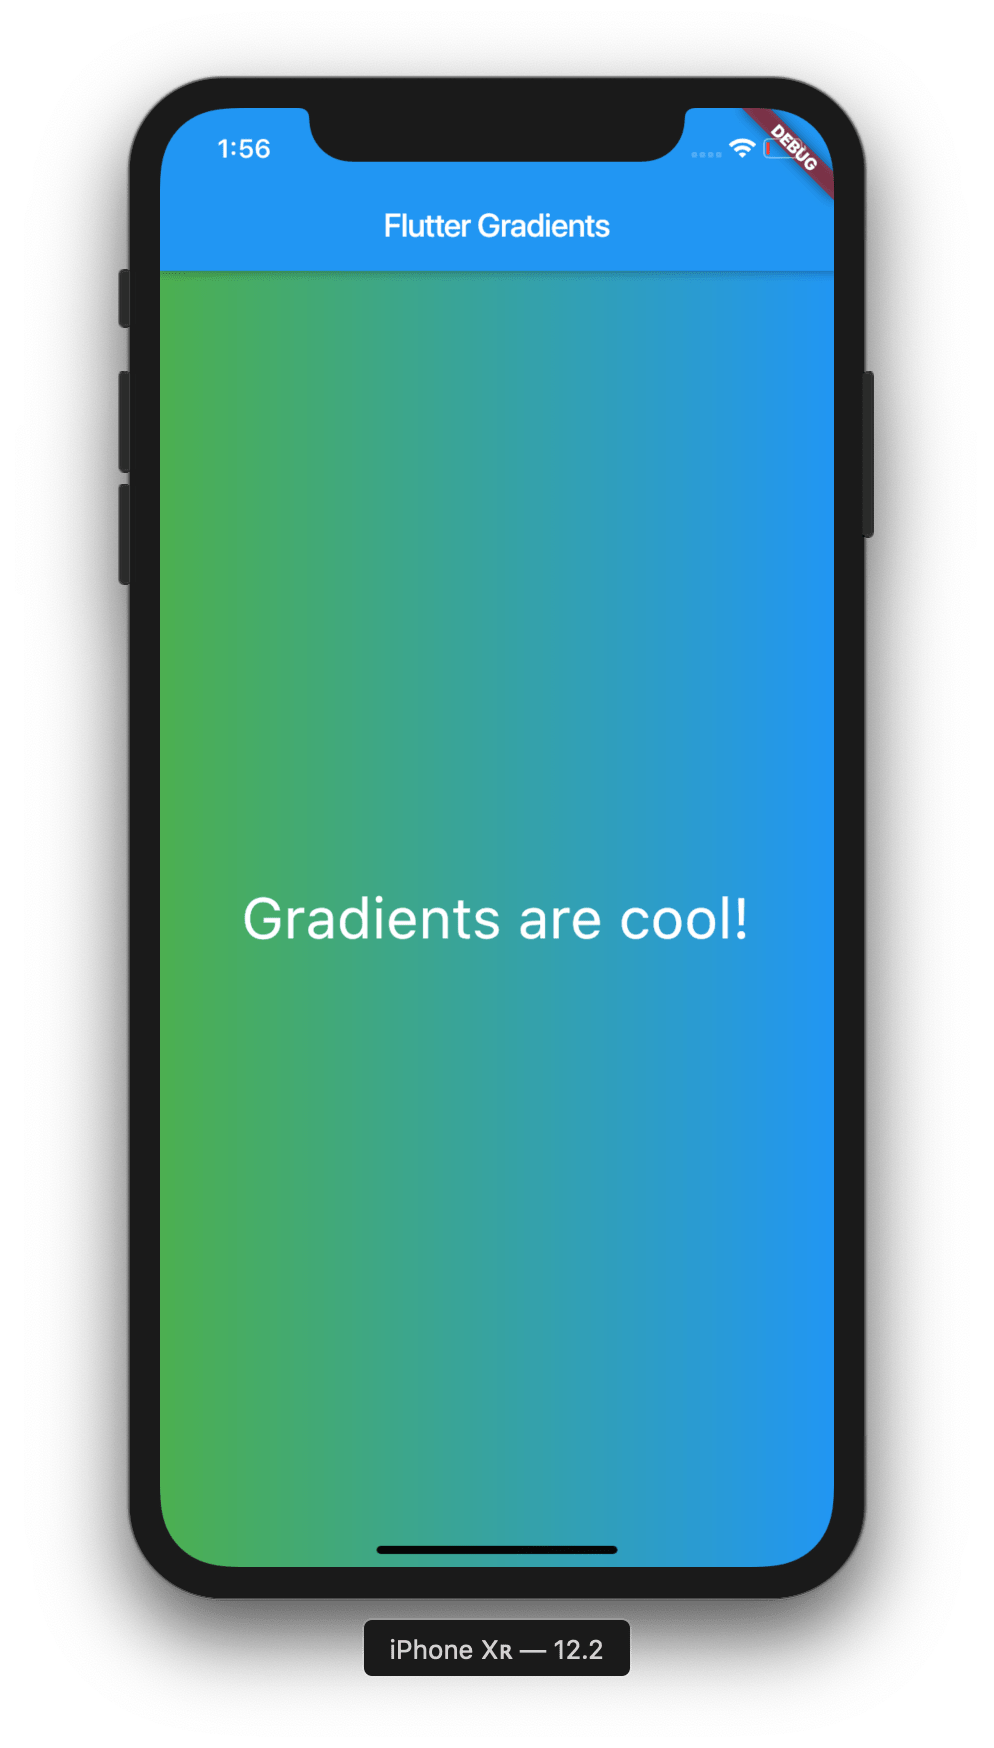
Great! We now have a linear gradient that goes from green to blue. Our app is already starting to look more beautiful. Let’s begin to explore some properties that we can assign to our LinearGradient in order to change its appearance.
Firstly, we can change where the gradient stops and starts by adding the begin and end properties. Let’s see if we can make our gradient go from the top left, to the bottom right of the screen.
body: Container(
  decoration: BoxDecoration(
    gradient: LinearGradient(
      begin: Alignment.topLeft,
      end: Alignment.bottomRight,
      colors: [Colors.green, Colors.blue])
  ),
  child: Center(
    child: Text('Gradients are cool!',
      style: TextStyle(
        fontSize: 35,
        color: Colors.white,
      ),
    ),
  ),
),
As you can see, we’ve added the properties of begin and end with values of Alignment.topLeft and Alignment.bottomRight. This should change how the gradient is aligned. Let’s have a look at our application now:
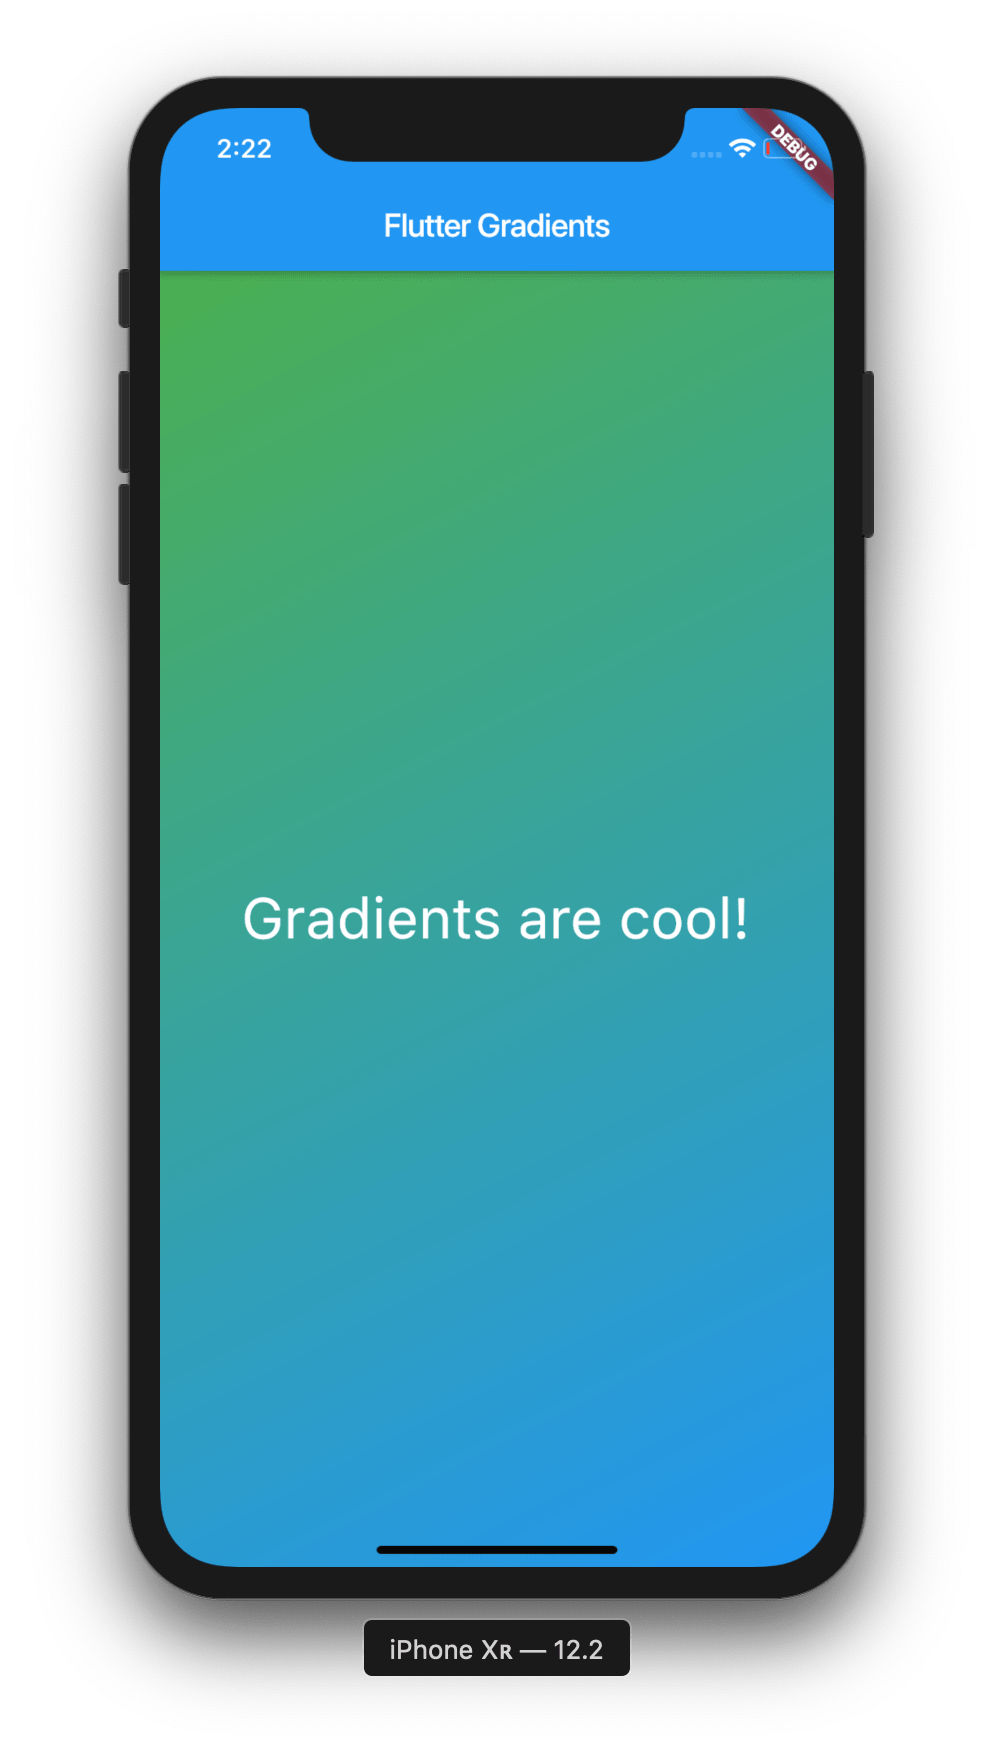
Much better. Now we have a gradient that is properly aligned, and looks great.
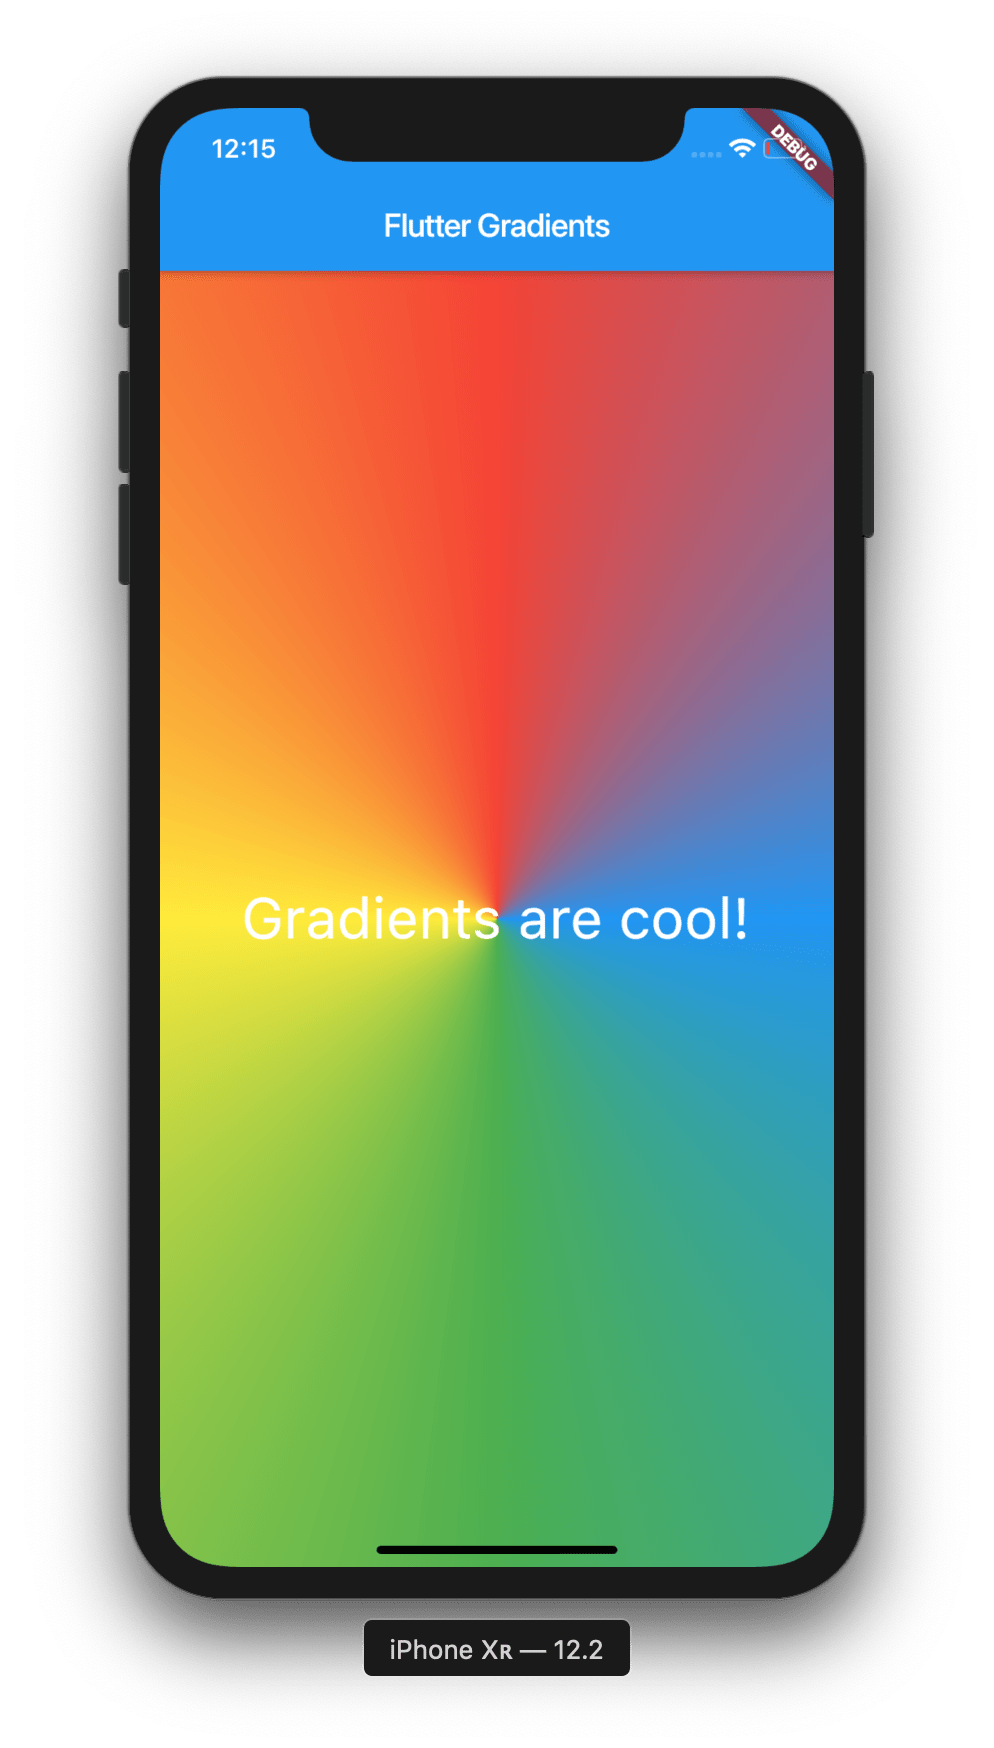
We can also determine the fractions along the gradient by using the stops property. To do that we need to assign a list of values from 0.0 to 1.0. Let’s try that out:
body: Container(
  decoration: BoxDecoration(
    gradient: LinearGradient(
      begin: Alignment.topLeft,
      end: Alignment.bottomRight,
      stops: [0.3, 1],
      colors: [Colors.green, Colors.blue])
  ),
  child: Center(
    child: Text('Gradients are cool!',
      style: TextStyle(
        fontSize: 35,
        color: Colors.white,
      ),
    ),
  ),
),
This value that has been assigned to the stops property should push the green part of our gradient closer to the bottom right of the screen. Let’s have a look at our app:
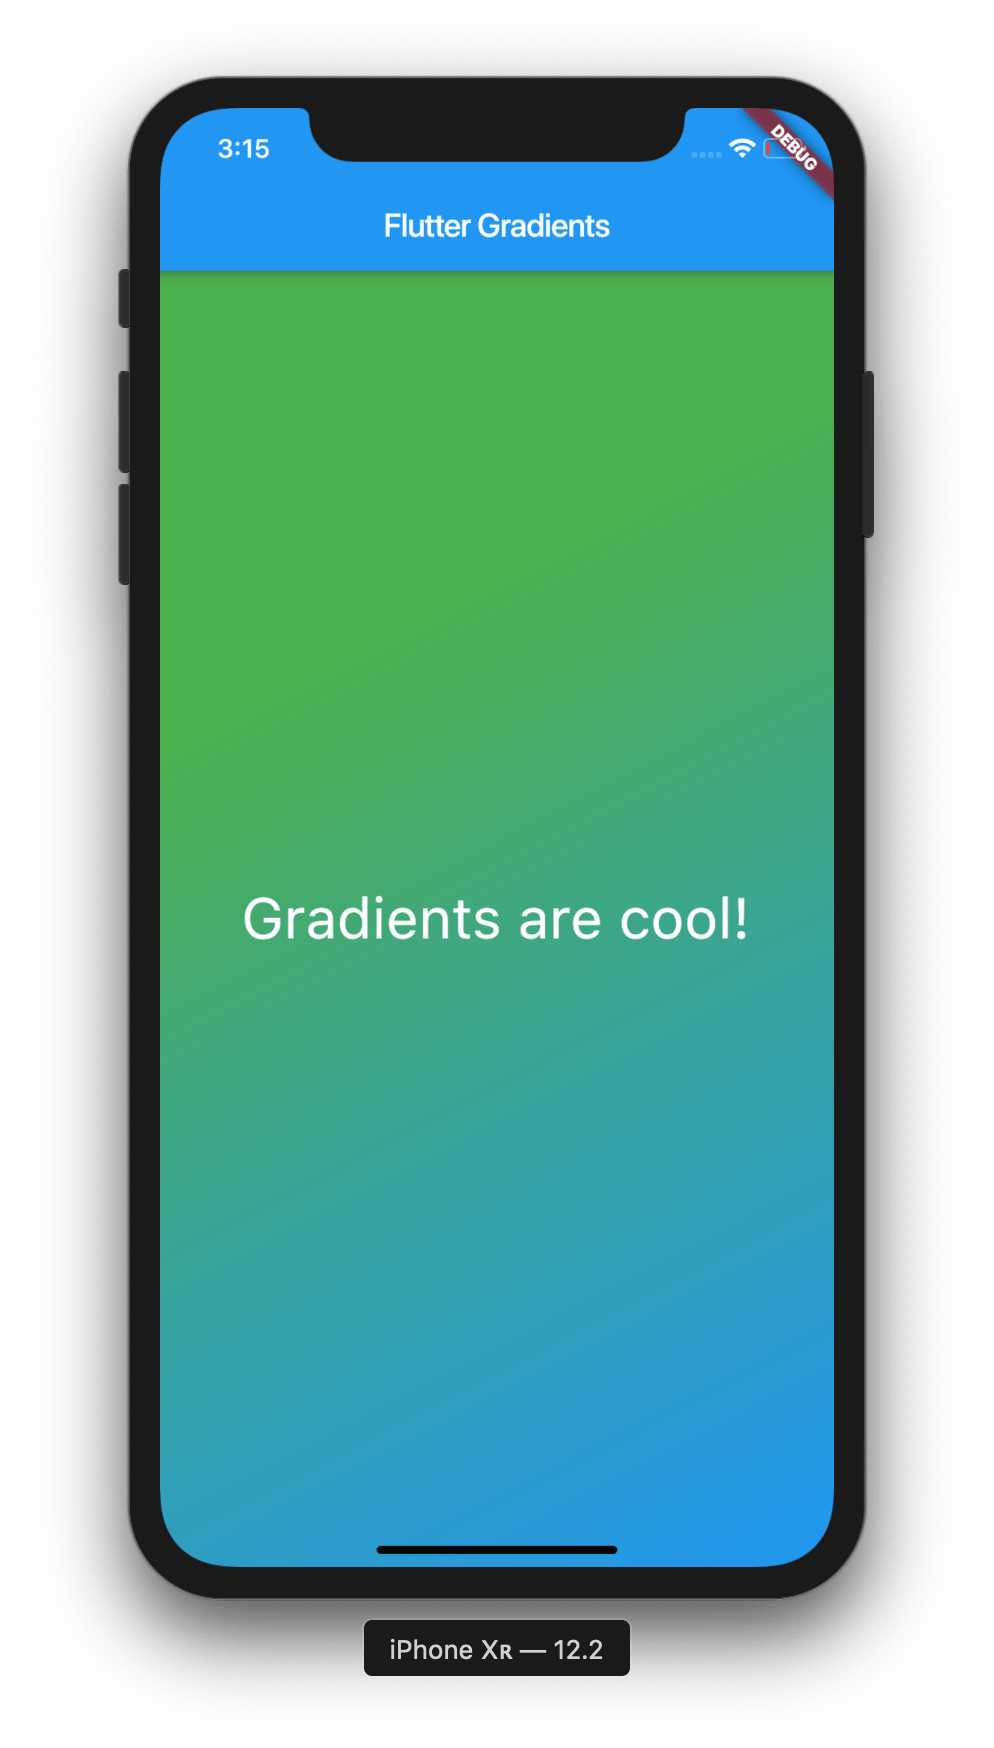
As you can see, the fraction of our gradient has been pushed further down the bottom right of the screen. If we increase the value of the stops property, the fraction would be pushed further down, so on and so forth.
We can also increase the amount of colours in our gradient, so let’s do that:
body: Container(
  decoration: BoxDecoration(
    gradient: LinearGradient(
      begin: Alignment.topLeft,
      end: Alignment.bottomRight,
      stops: [0.1, 0.3, 0.7, 1],
      colors: [Colors.green, Colors.blue, Colors.orange, Colors.pink])
  ),
  child: Center(
    child: Text('Gradients are cool!',
      style: TextStyle(
        fontSize: 35,
        color: Colors.white,
      ),
    ),
  ),
),
We’ve now added 2 colours, orange and pink. We’ve also added two new values to our stops property and changed the point in which the colours in our gradient stop. Let’s have a look at what we have now:
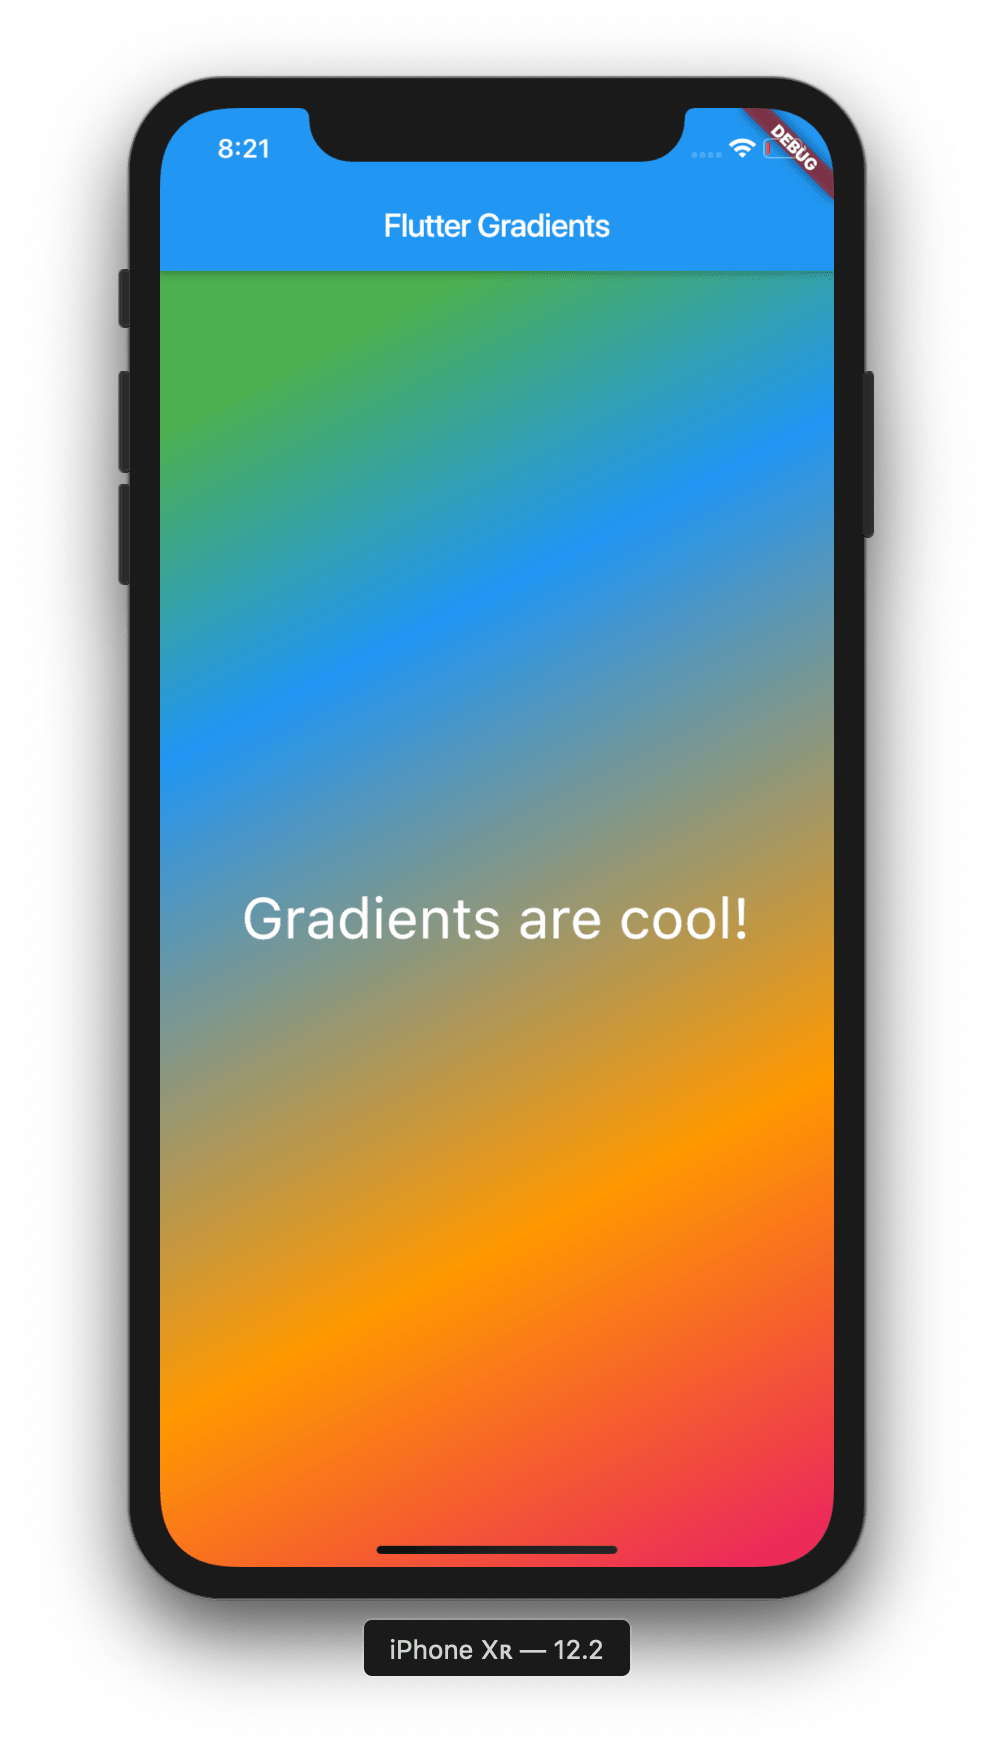
Cool huh? Our gradient now has 4 colours, and we can see where each of the them has been divided.
Next up we’re going to explore how to use radial gradients in Flutter.
Radial Gradients
Radial Gradients are quite similar to Linear Gradients, in that they take in properties such as colors and stops, but they also take in some other properties, such as radius, focal and tileMode. Let’s implement a radial gradient into our application:
body: Container(
  decoration: BoxDecoration(
      gradient: RadialGradient(
        colors: [Colors.green, Colors.blue]
      ),
      ),
  child: Center(
    child: Text(
      'Gradients are cool!',
      style: TextStyle(
        fontSize: 35,
        color: Colors.white,
      ),
    ),
  ),
),
As you can see, implementing a radial gradient is very simple. Let’s have a look at our application:
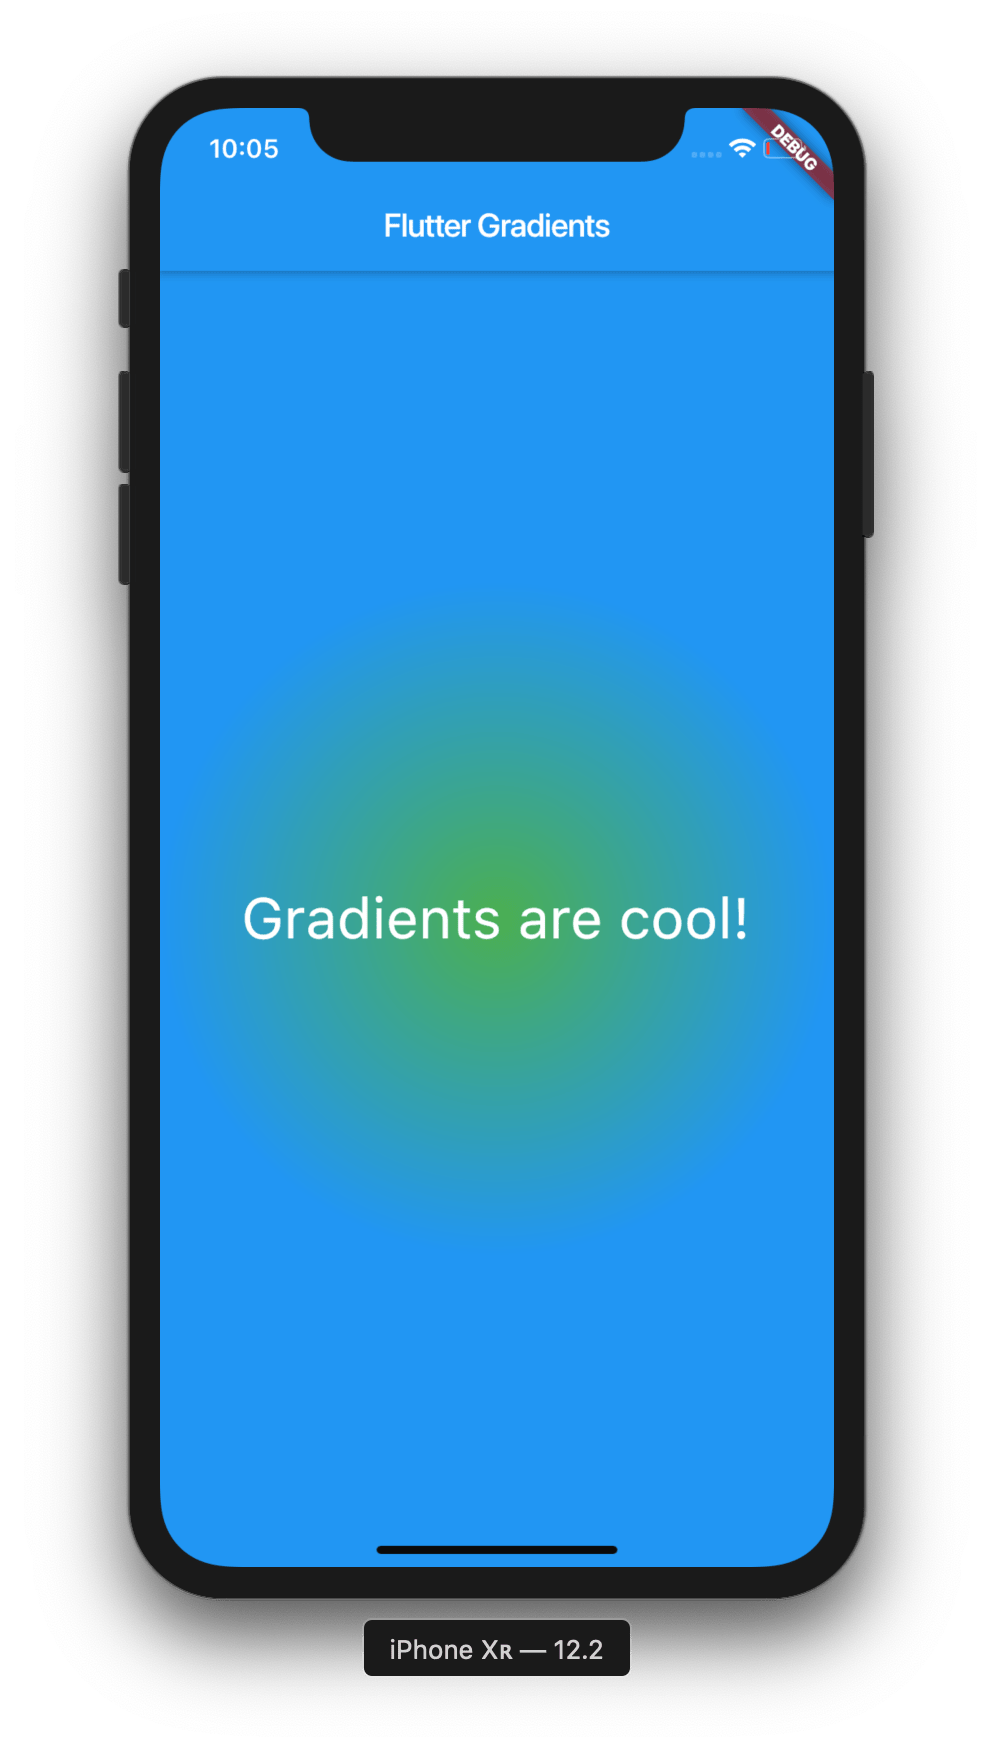
Great! We can see that our gradient is fully working and is circle shaped, hence the name radial. Let’s now try and change the appearance of our gradient by assigning some properties.
We’ll start by adding some more colours, as well as the stops property.
body: Container(
  decoration: BoxDecoration(
      gradient: RadialGradient(
        colors: [Colors.green, Colors.blue, Colors.orange,Colors.pink],
        stops: [0.2, 0.5, 0.7, 1]
      ),
      ),
  child: Center(
    child: Text(
      'Gradients are cool!',
      style: TextStyle(
        fontSize: 35,
        color: Colors.white,
      ),
    ),
  ),
),
Let’s have a look at what that gives us now:
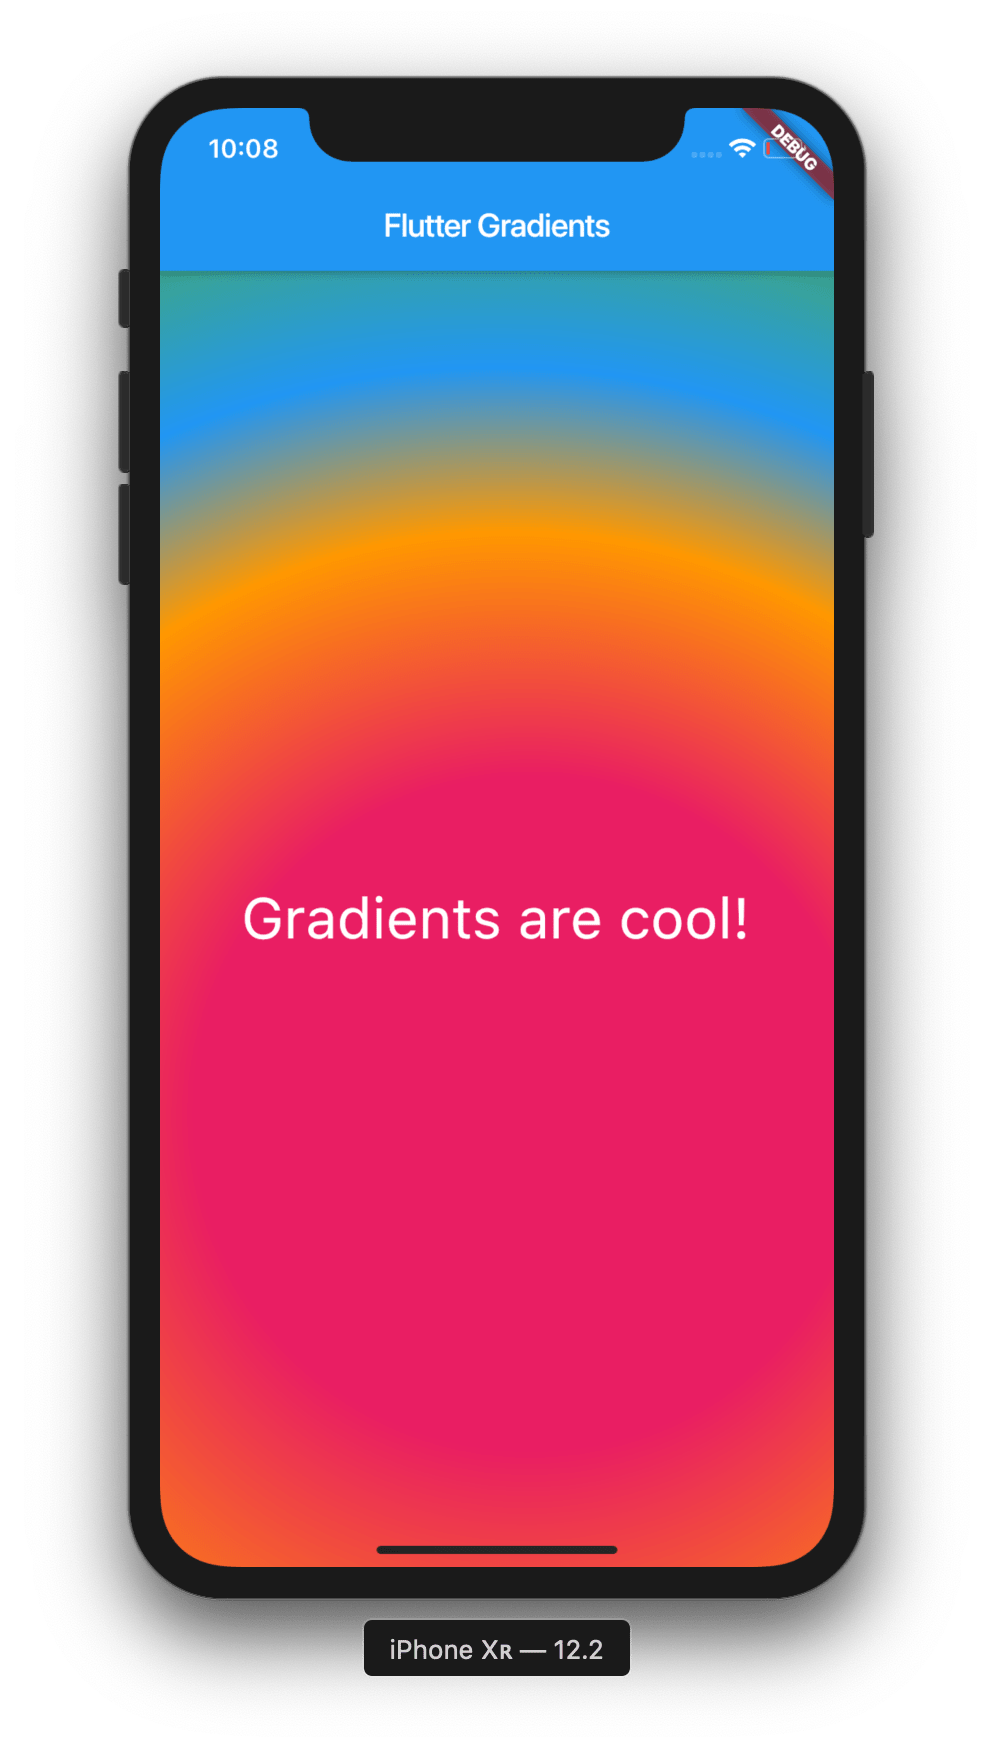
Okay, we’ve now got a gradient with multiple colours, so let’s try and change the alignment of our gradient:
body: Container(
  decoration: BoxDecoration(
      gradient: RadialGradient(
        colors: [Colors.green, Colors.blue, Colors.orange, Colors.pink],
        stops: [0.2, 0.5, 0.7, 1],
        center: Alignment(0.1, 0.3),
      ),
      ),
  child: Center(
    child: Text(
      'Gradients are cool!',
      style: TextStyle(
        fontSize: 35,
        color: Colors.white,
      ),
    ),
  ),
),
As you can see, we’ve added the center property to our gradient, which should shift it downwards and to the right. Let’s have a look at our application now:
Great! We’ve actually moved our gradient to a different position on the screen now, which is quite interesting. Depending on the values that we assign to our center property, our gradient could be placed anywhere.
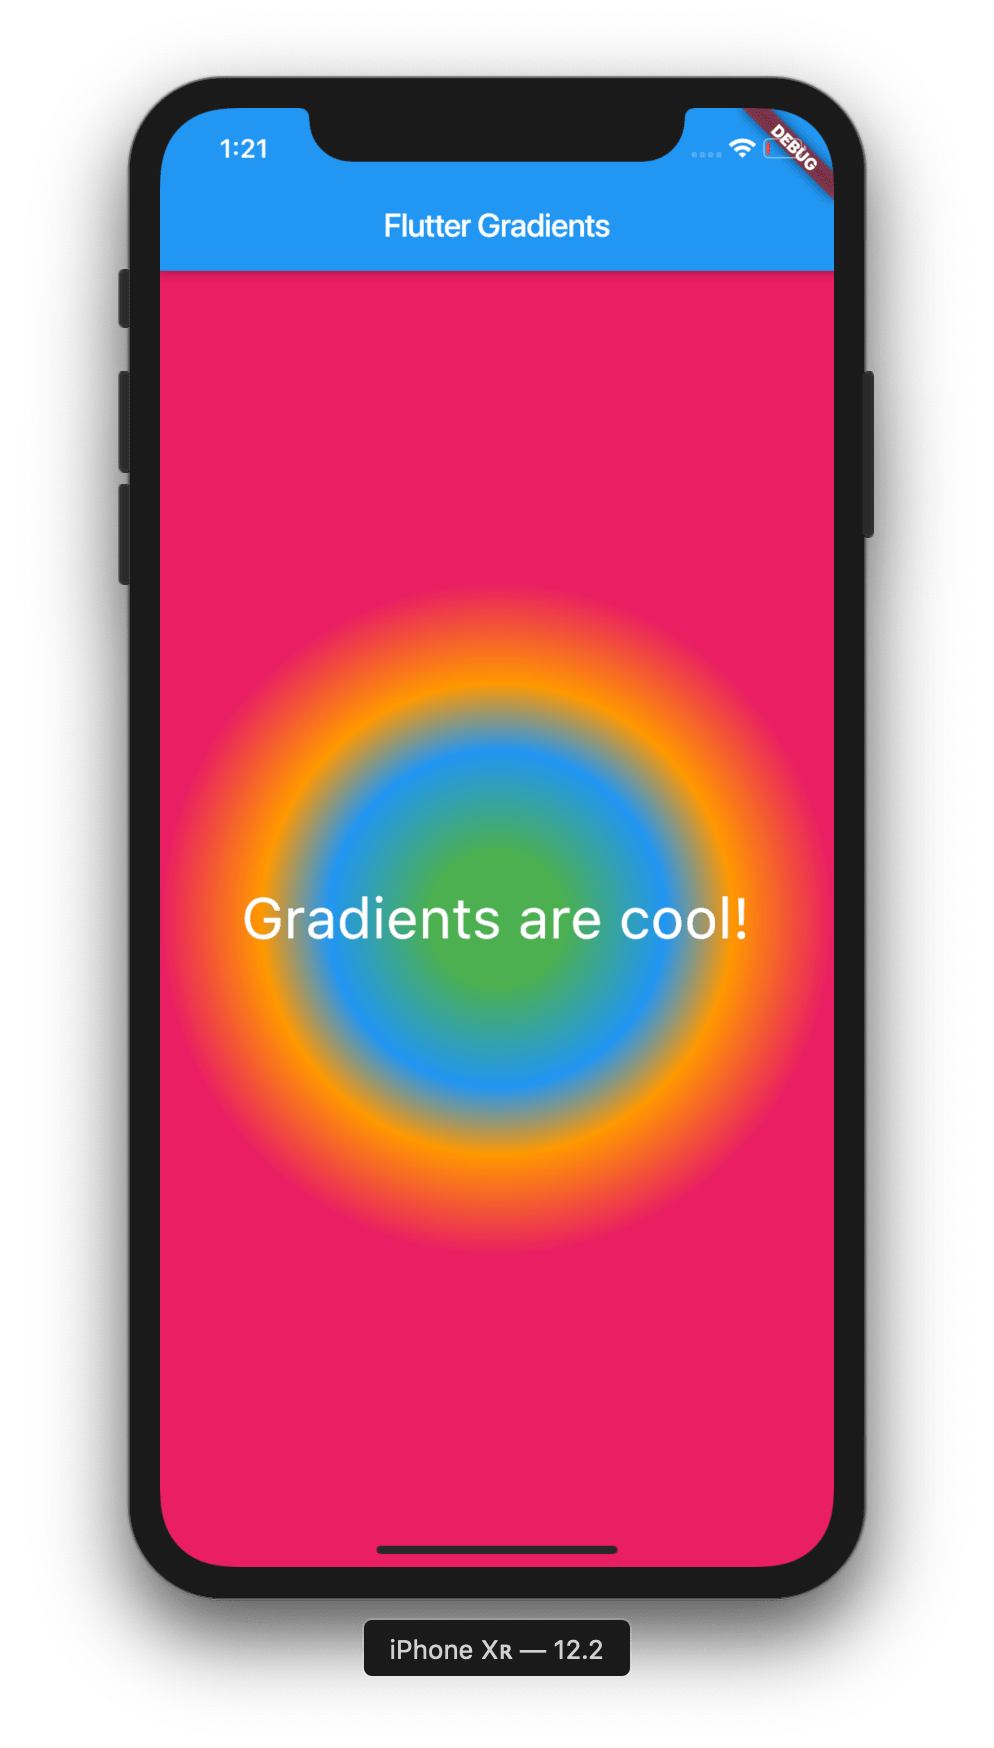
Another thing we can do is change the focal point of our gradient. We can do that by adding the focal property to our gradient. Let’s do that:
body: Container(
  decoration: BoxDecoration(
      gradient: RadialGradient(
        colors: [Colors.green, Colors.blue, Colors.orange, Colors.pink],
        stops: [0.2, 0.5, 0.7, 1],
        center: Alignment(0.1, 0.3),
        focal: Alignment(-0.1, 0.6),
      ),
      ),
  child: Center(
    child: Text(
      'Gradients are cool!',
      style: TextStyle(
        fontSize: 35,
        color: Colors.white,
      ),
    ),
  ),
),
Let’s see what that gives us now:
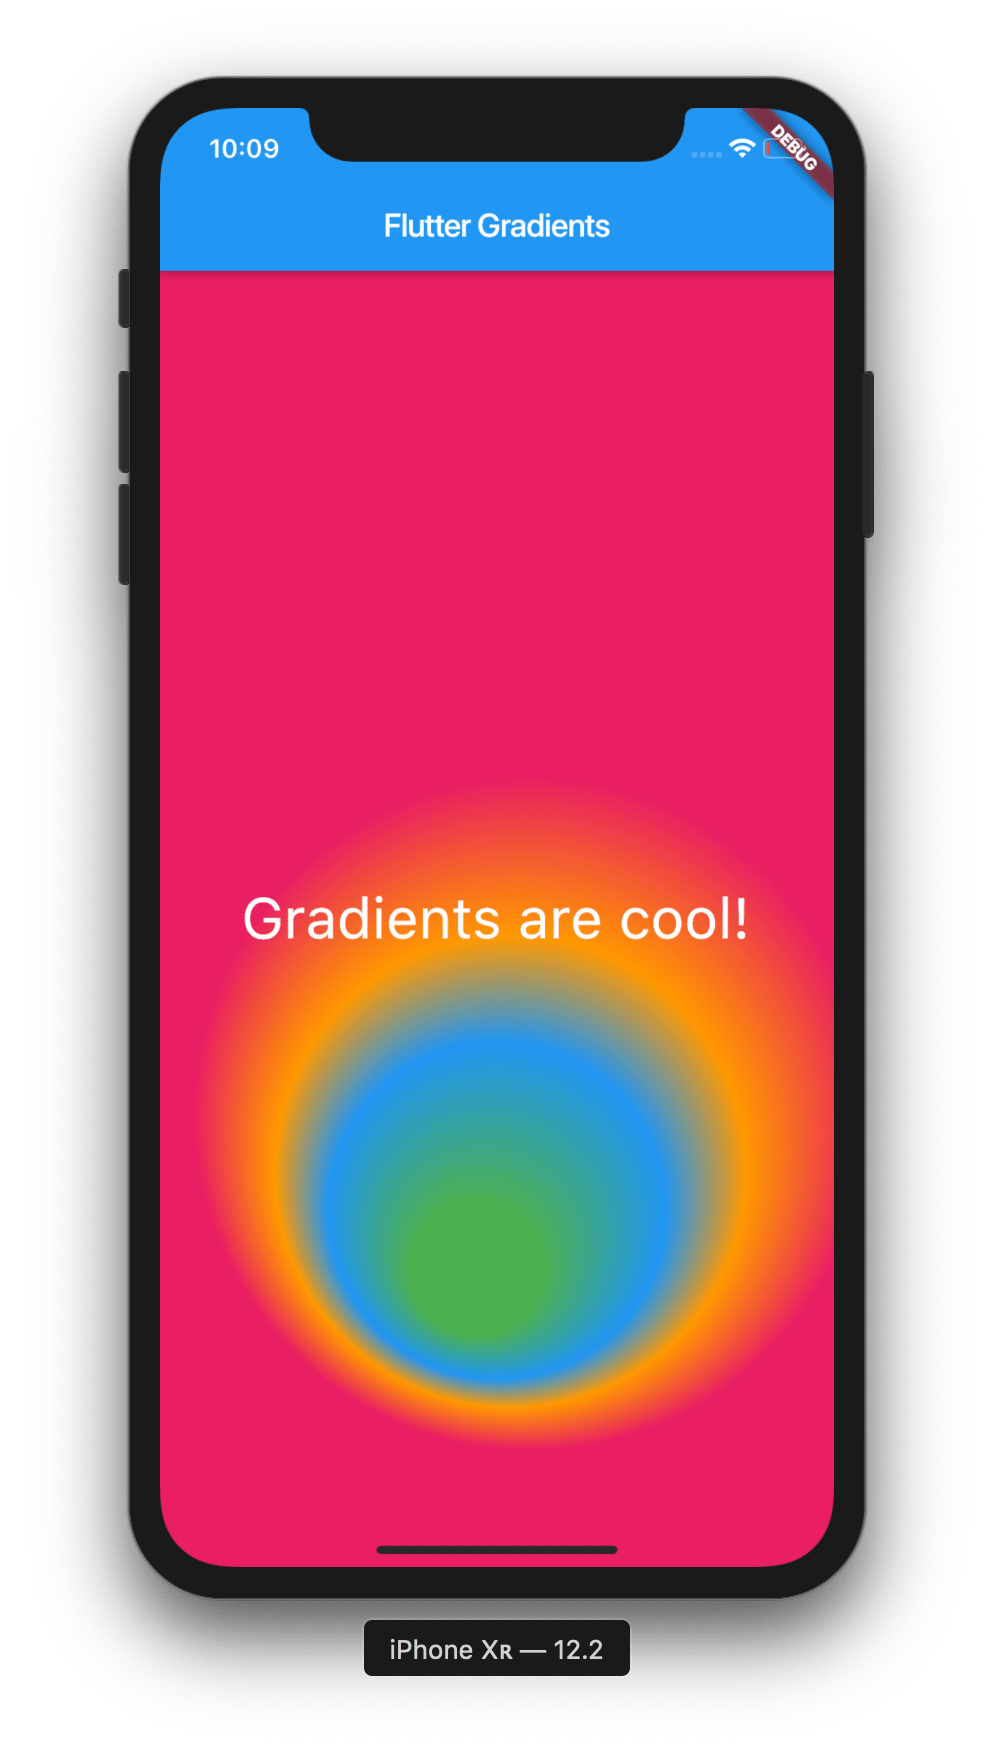
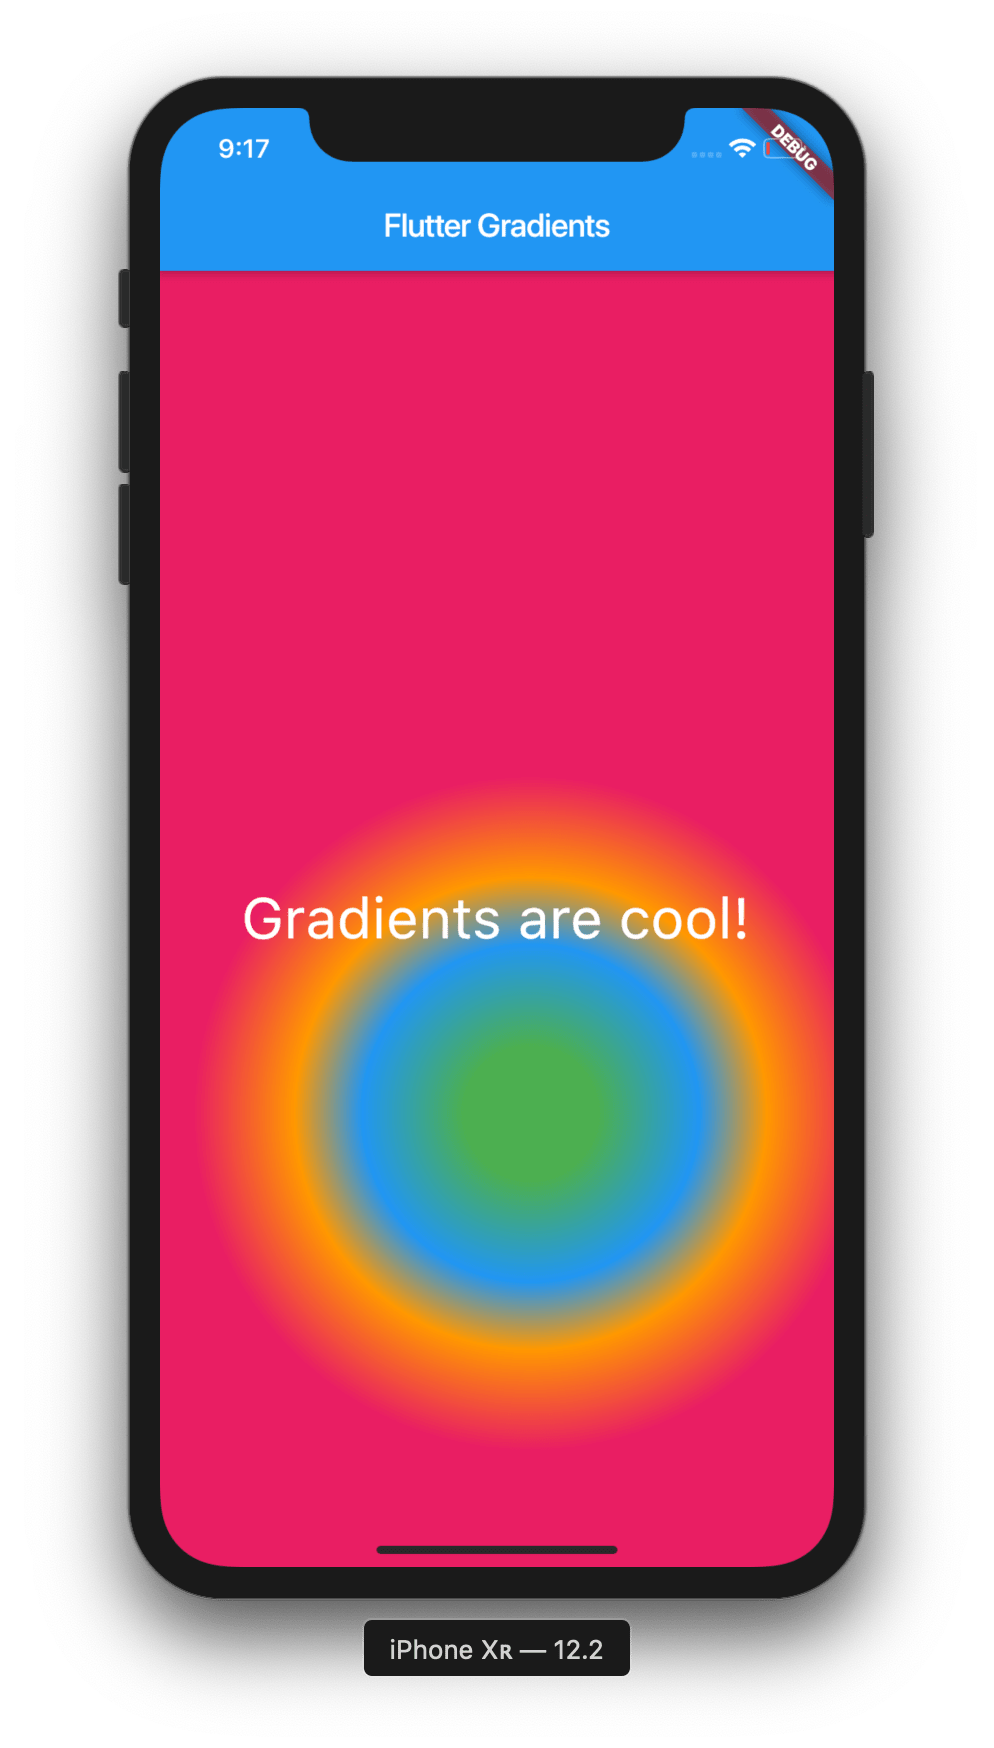
Cool, we’ve now changed the focal point of our radial gradient. But what if we wanted to change the size of our focal point? We can do that by using the focalRadius property on our gradient. Here’s how we’d do that:
body: Container(
  decoration: BoxDecoration(
      gradient: RadialGradient(
        colors: [Colors.green, Colors.blue, Colors.orange, Colors.pink],
        stops: [0.2, 0.5, 0.7, 1],
        center: Alignment(0.1, 0.3),
        focal: Alignment(-0.1, 0.6),
        focalRadius: 2,
      ),
      ),
  child: Center(
    child: Text(
      'Gradients are cool!',
      style: TextStyle(
        fontSize: 35,
        color: Colors.white,
      ),
    ),
  ),
),
Let’s see what our app is looking like now:
As we can see, our gradient has drasically increased in size.
Next up we’re going to explore how to use sweep gradients in Flutter.
Sweep Gradients
Sweep Gradients are similar to the other two gradients, however they take in properties such as startAngle and endAngle. Let’s implement a sweep gradient into our application with some colour and some stops:
body: Container(
  decoration: BoxDecoration(
      gradient: SweepGradient(
        colors: [Colors.blue, Colors.green, Colors.yellow, Colors.red, Colors.blue],
        stops: [0.0, 0.25, 0.5, 0.75, 1],
      ),
      ),
  child: Center(
    child: Text(
      'Gradients are cool!',
      style: TextStyle(
        fontSize: 35,
        color: Colors.white,
      ),
    ),
  ),
),
Let’s now have a look at our application:
Awesome. With sweep gradients, we can actually create some pretty cool effects with the startAngle and endAngle properties. Let’s experiment a little bit:
body: Container(
  decoration: BoxDecoration(
      gradient: SweepGradient(
        colors: [Colors.blue, Colors.green, Colors.yellow, Colors.red, Colors.blue],
        stops: [0.0, 0.25, 0.5, 0.75, 1],
        startAngle: 0.5,
        endAngle: 1
      ),
      ),
  child: Center(
    child: Text(
      'Gradients are cool!',
      style: TextStyle(
        fontSize: 35,
        color: Colors.white,
      ),
    ),
  ),
),
Now, let’s have a look at what our app looks like:
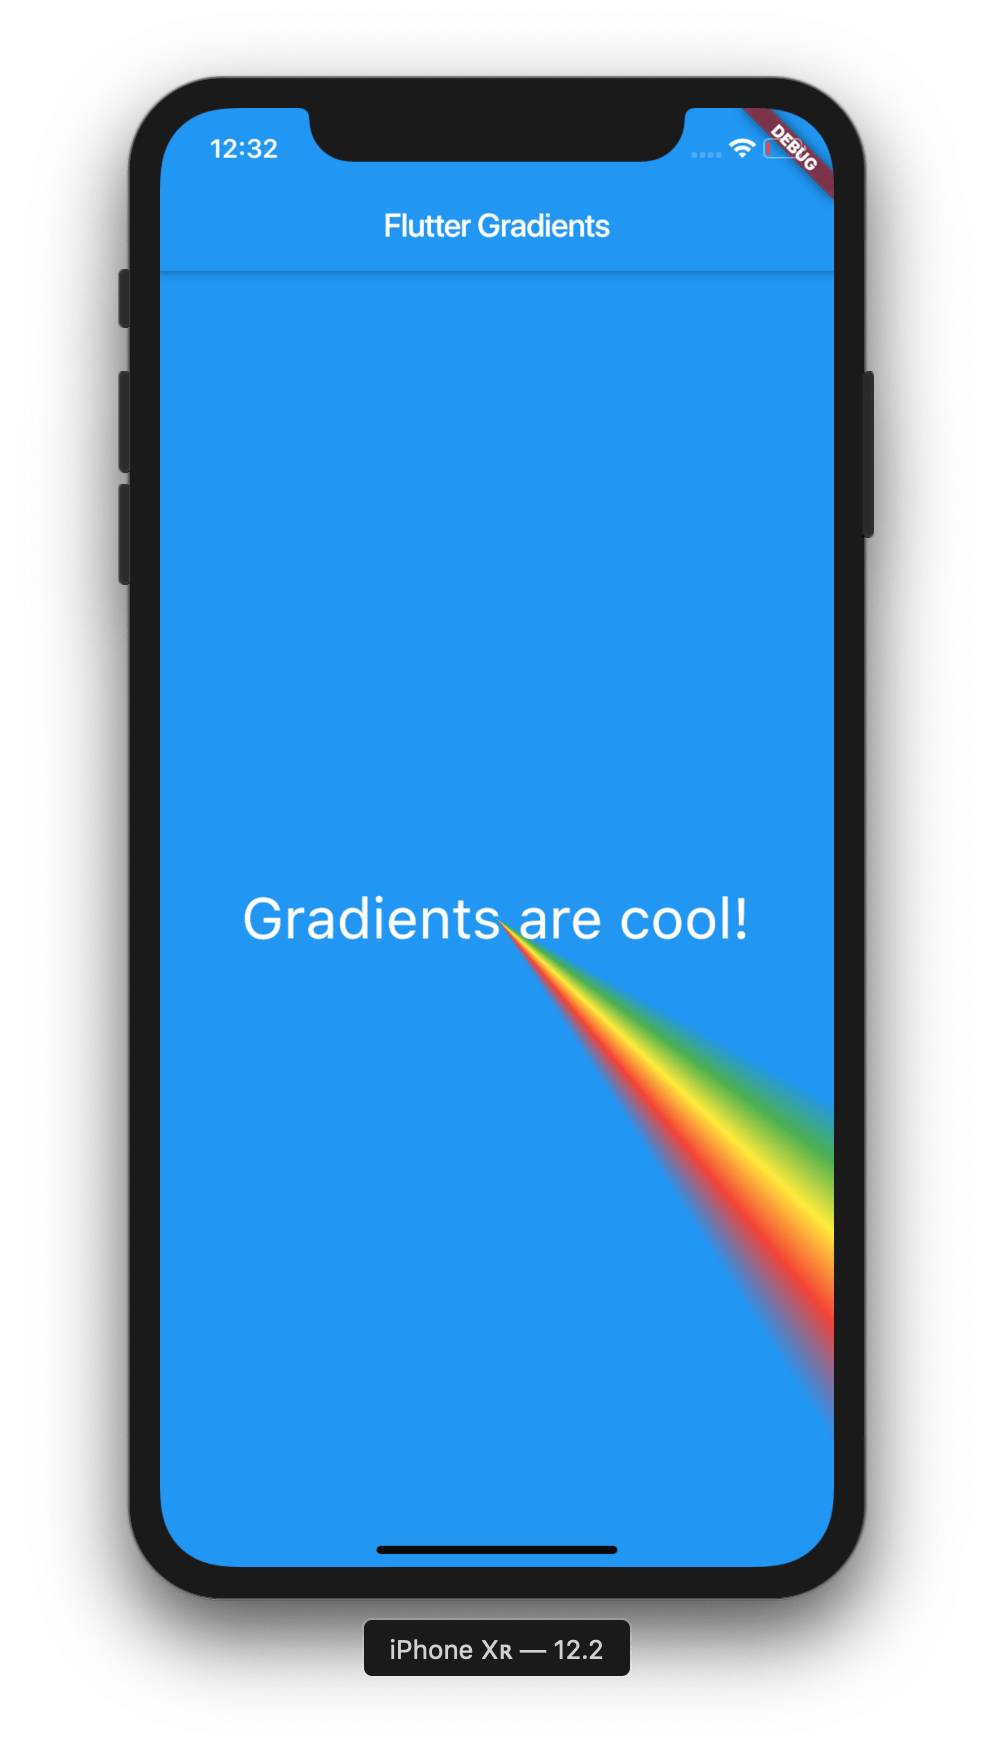
As you can see, we’ve created a rainbow effect on our screen. This is just one of the many awesome things that we can do with gradients in Flutter.
In this post we’ve learned how to create three types of gradients in Flutter, a linear gradient, a radial gradient and a sweep gradient. We’ve also learned how to assign different properties to our gradients in order to make them look different.
I hope you’ve taken a lot from this post, and don’t forget to subscribe for future Flutter content! <3
The source code for this project can be found here: https://github.com/ohalliday/flutter-gradients